DIY Repairs · Find tips and tricks how to get your foreGestalt companion back in shape
DIY Repairs
Find tips and tricks how to get your foreGestalt companion back in shape with our DIY repair guides! From silicone sheath fixes to pulling insert replacements, we’ve got you covered.
Some parts of your foreGestalt companion may fail over time. The following three issues have been reported: The silicone sheath may tear after mechanical impact, the central pulling insert may tear apart or the bead insertion buckle of the strap may break. The good news: In most cases, they are rather easy to repair or to substitute.
How to repair tears or holes in the silicone sheath
You should be able get your companion back to work quickly with this rather easy repair procedure. In our tests, any hole, tear or surface alteration can be durably fused with common multipurpose silicone sealants (e.g., for aquariums, bath tiles, windows; most of these are skin-safe). It helps to align the edges of a tear or hole by temporarily slipping the sheath onto a tubular and smooth support structure made from plastic (e.g., a whiteboard marker, glue stick or anything smooth that fits the inner diameter of the tubular sheath) and to keep it there until the sealant has completely cured (usually 24 – 48 hours). Glass or rough surfaces are not suited. Optionally, it also helps to apply a thin film of liquid soap (undiluted) onto the support tube beforehand and let it dry to the touch. This will avoid the silicone sealant to bond to the support and furthermore ease the release of the sheath after its complete curing.
Such repair usually leads to a long-lasting ‘rejuvenation’ of a foreGestalt companion. In any case, it is important that the compromised areas are clean and dry before getting started. For this, rubbing alcohol (isopropanol) works great in stripping off any residues that do not wash off with soapy water.
Please also consider that commercial sealants are not as tacky as the silicone from which the sheath was fabricated. If you have a choice, you may want to apply the sealant predominantly onto the inside of the tubular sheath rather than on its outside to keep as much of the tackiness of the outside face intact as possible. It is the outside face that will come into contact with your skin once the sheath has been folded over during device application.
To repair any signs of superficial abrasion, it is usually sufficient to fold the sheath over and apply a thin film of silicone sealant (e.g., with a soft brush) onto the thus exposed inside of the compromised areas. If holes were present, first slip some paper underneath to not let the sealant glue the sheath permanently to the lower mushroom-shaped body.
How to repair, print and/or substitute a pulling insert
If you have access to 3D printing technology (or a nearby shop that offers this service), you may print a new pulling insert yourself. Click on the button that matches your companion size to download the zipped STL file.
These parts can be equally printed with either a filament (e.g., PLA or ABS) or a SLA printer without need of further modification or support structures. If you prepare the pulling insert for a printout on a filament printer, preferably either choose a wall thickness of >3 mm (>0.118″) or set the infill to 100% to create a sturdy tube without cavities. Please remember to remove any sharp edges at the bottom of the pulling insert after its printout (e.g., filed or sanded off) to not cut/damage the silicone body of your companion upon the insertion of the part.
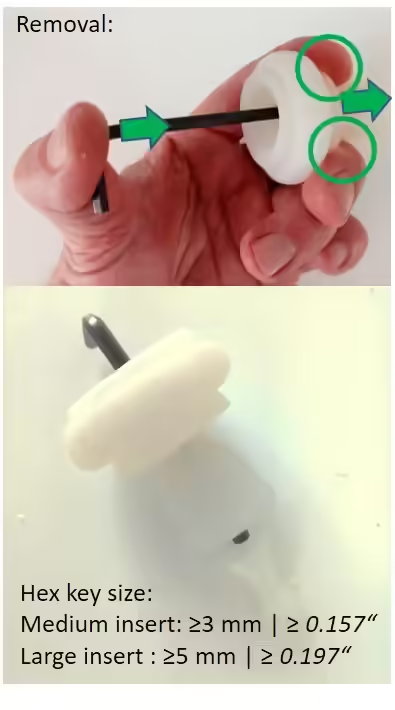
Removal:
Before starting, make sure that there are no sharp edges sticking out to the sides of the old pulling insert on its top edge (such as a broken string insertion appendix) to not cut the silicone body. You can break off any remaining pieces of the appendix with a pair of pliers beforehand.
Then, push the broken pulling insert with a blunt, slender tool (e.g. Allen key, blunt pen) from top towards the bottom. Make sure to not use any sharp objects to not risk the piercing of the silicone. For this, 1. roll the sheath up to rest on the mushroom-shaped cap. 2. place your index finger and your middle finger (green circles) below the ledge of the mushroom-shaped cap to counteract the force on the tool applied by your thumb from top. The pulling insert will pop out at the bottom. ‚Greasing‘ the pulling insert beforehand with a few drops of rubbing alcohol (isopropanol) or liquid soap from above and below will make this process easier. Try to let the greasing agent enter into the cavity by squeezing / massaging the mushroom-shaped lower body all around until you hear a squishy sound.
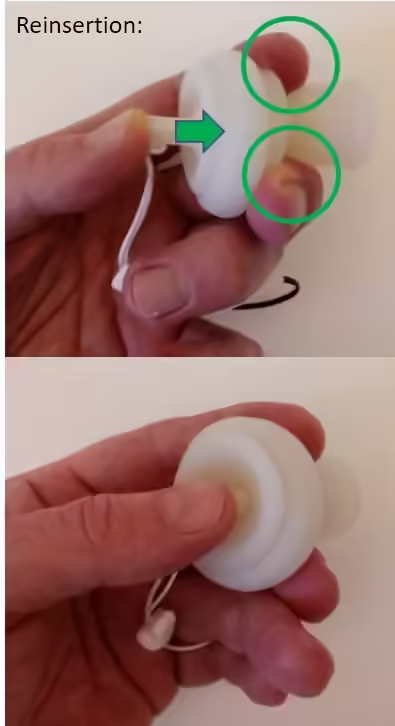
Reinsertion:
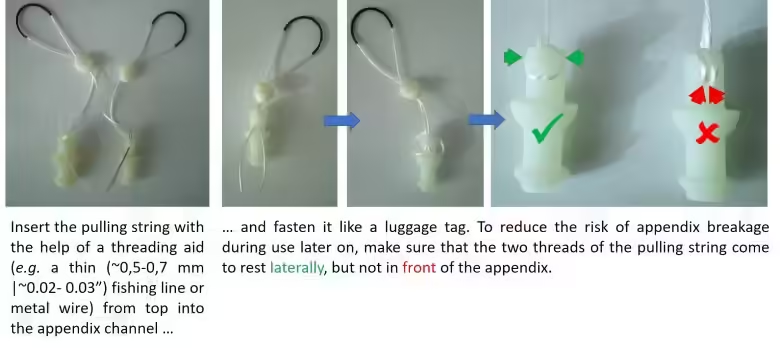
Make sure the string is already attached (like a luggage tag; see image sequence below) to the top appendix of the new or repaired pulling insert. It would otherwise be difficult to thread it into the appendix after the pulling insert has been placed into the central cavity of your companion.
Slightly wet both the pulling insert and the inside cavity of the foreGestalt silicone body (where the pulling insert will be placed into) with rubbing alcohol (if available) or soapy water. They act as ‘grease’ to facilitate the reinsertion procedure.
Then, push the new or repaired pulling insert with your thumb from the top towards the bottom into your foreGestalt companion. For this, as before, place your index finger and your middle finger (green circles) below the ledge of the mushroom-shaped cap to counteract the force on the insert applied by your thumb from top. Once it snaps for the second time, it is in its correct position.
Pulling insert bolt substitution workaround
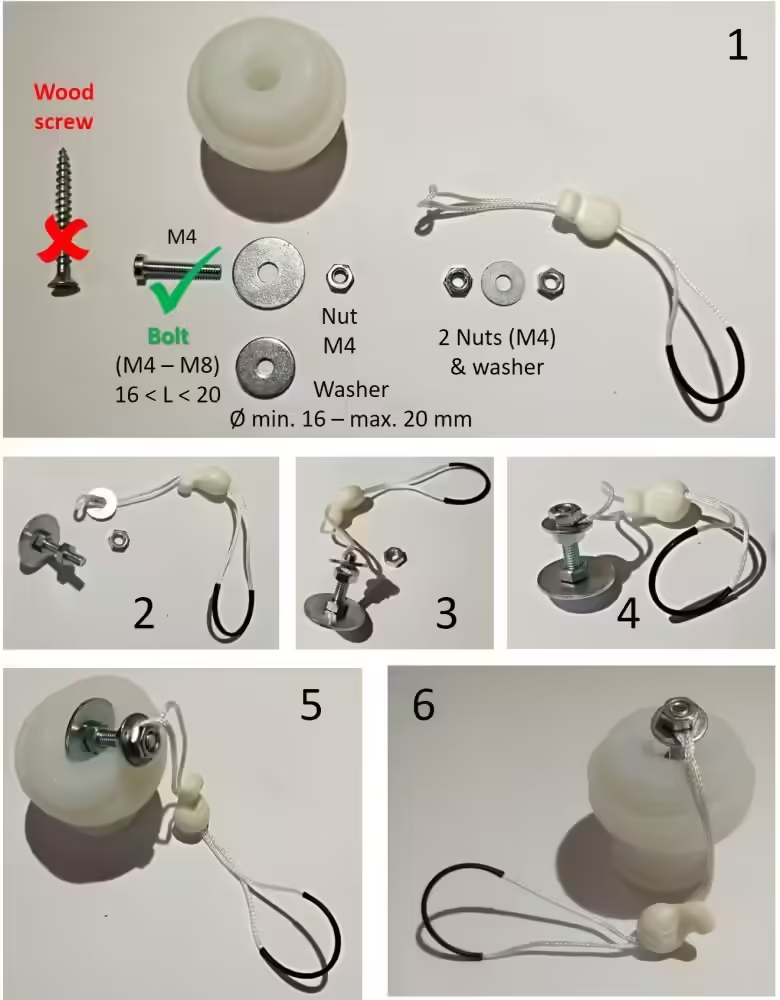
While you are waiting for the replacement of your broken pulling insert, you can continue using your companion with the following workaround. [1] For a medium-sized companion (above example), it requires a bolt of length ‘L’ between 16 and 20 mm. Longer bolts will work as well, but will notably stick out. Wood screws are not suited for their pointed tip and sharp thread edges. The bolt diameter may range between M4 and M8 (4 mm to 8 mm). Furthermore, you will need three corresponding nuts, a small washer, and a washer with a diameter between 16 and 20 mm. Make sure there are no sharp edges on any of the two washers (to not inflict any damage to the silicone body upon the insertion of the pulling insert surrogate). [2] Firstly, thread the large washer onto the bolt and secure it with one of the nuts. Then, thread a nut onto the bolt near its top. Furthermore, thread the lower pulling string through the small washer. [3] Sling the pulling string (that exits from the washer below) around the bolt, then place the washer above. [4] Secure the washer with the third nut. This entraps the pulling string between the lower nut, the washer, and the upper nut. [5] Press the head of the bolt together with the large washer from top and diagonally into the cavity of the silicone body. Soapy water or isopropanol will help in ‘greasing’ the silicone to let the washer enter into the cavity more easily. [6] After about 7 mm into the cavity, the washer will snap into place underneath the inner ledge. You are all set now! For small-sized companions, the diameter of the large washer should range between 14 and 16 mm, for large-sized companions between 20 and 24 mm.
How to print and thread the bead insertion buckle onto the strap
Should the buckle break, you can (temporarily) replace it by a large ‘butterfly’ paper clip.
If you have access to 3D printing technology (or a nearby shop that offers this service), you can print a new bead insertion buckle yourself. It can be equally printed with either a filament (e.g., PLA or ABS) or a SLA printer without need of further modification or support structures. Click on the button below to download the zipped STL file.
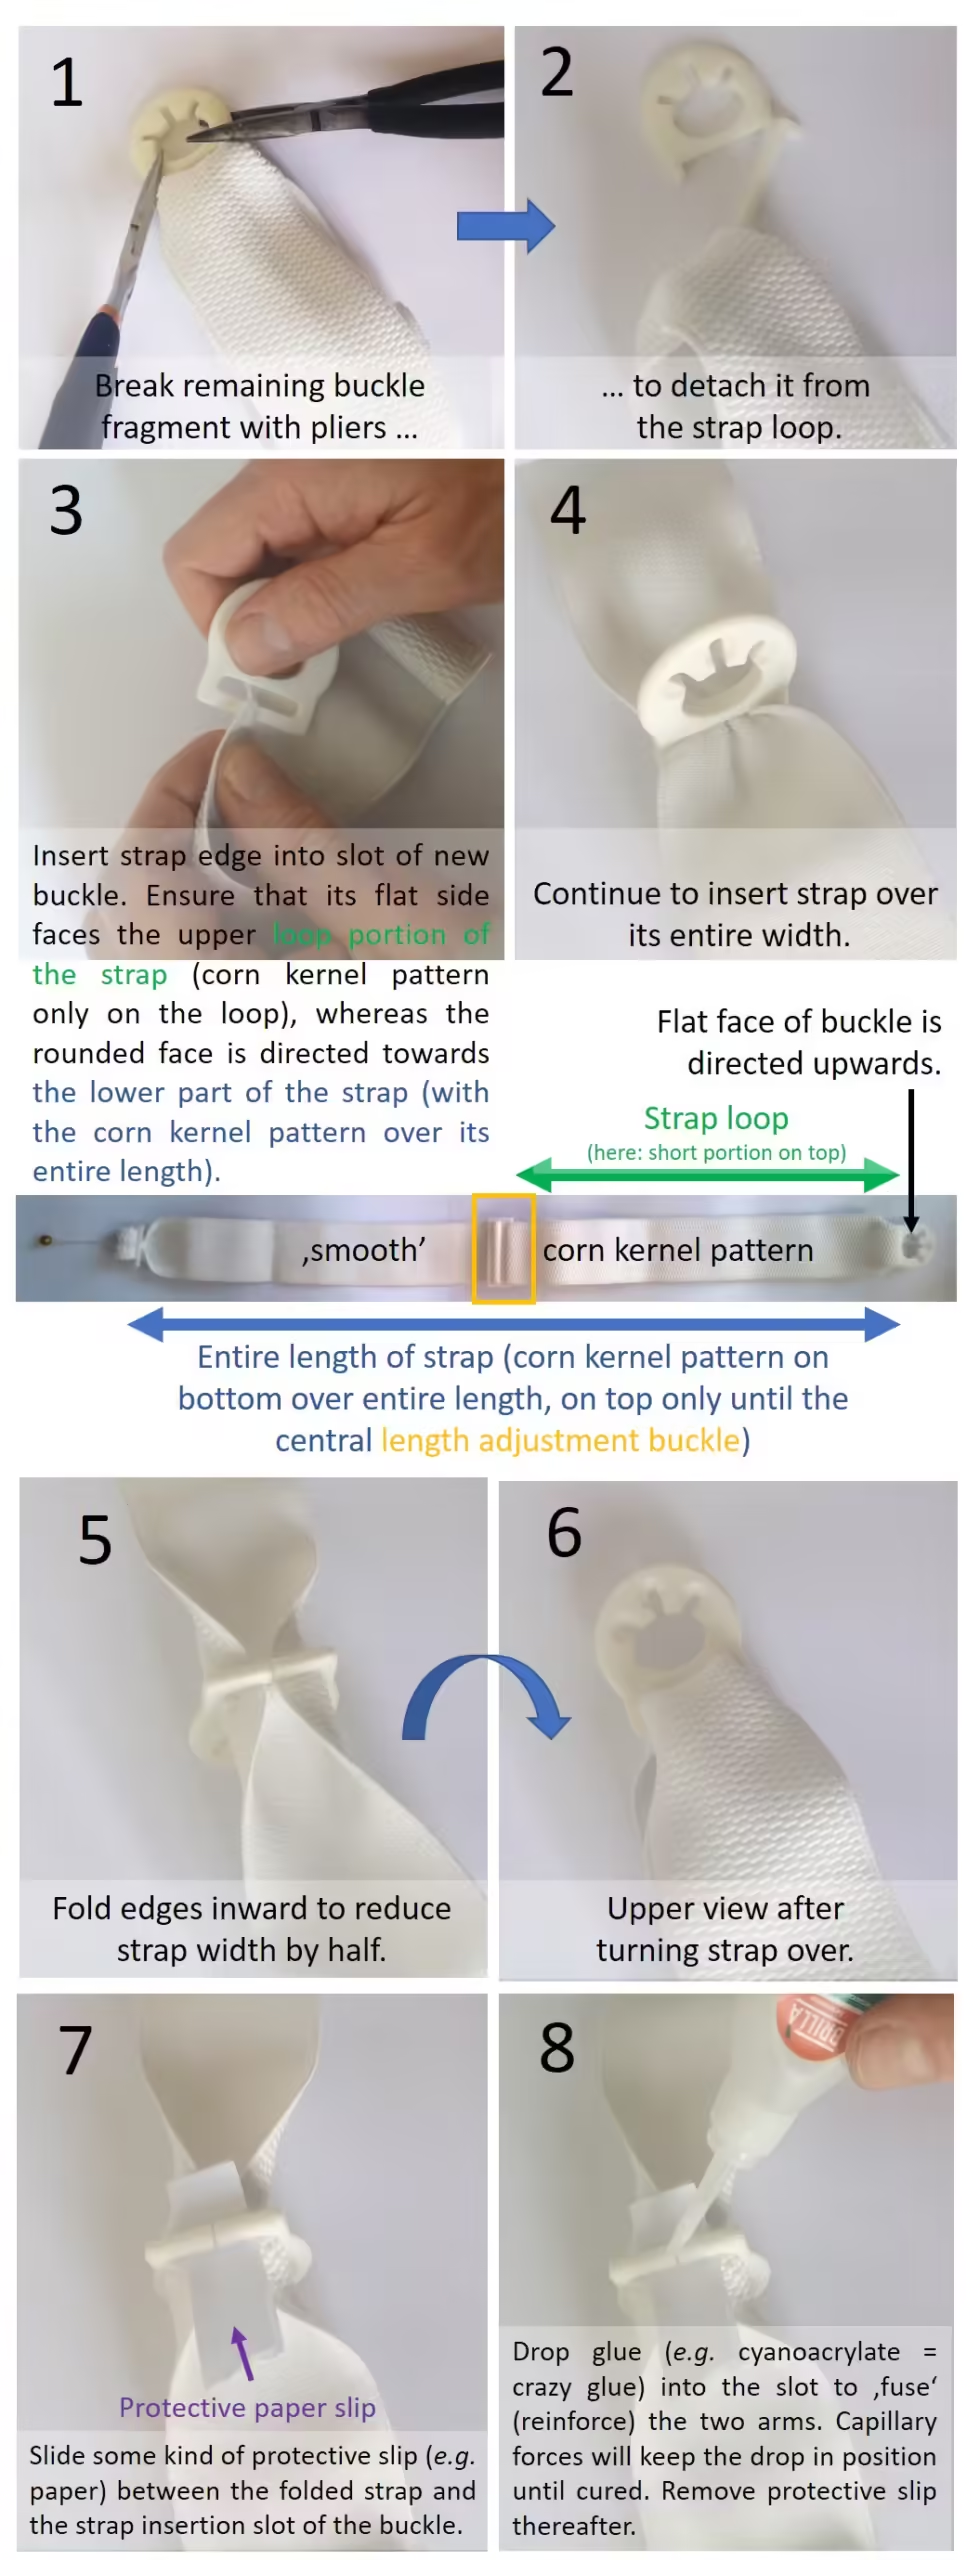
Once printed, follow the picture guide below to reinsert the spare. The replacement carries a slot, which allows you to thread it into the strap.
